Download

How To Setup Cocos2d-x V3.x on Windows Step By Step :

In this article I will guide you how to setup Cocos2d-x V3.x engine on the Windows 7. Note: Engine does not use the Windows XP OS. The latest version now is v3.6 (Apr.30, 2015).
The installation of this engine is actually quite complex to many people, because it does not simply run the setup.exe file, then Next, Next, Finish. It requires the system configuration, install the plugin for it to be able to run. And to run it must through one Editor program (Visual Studio, for example). Will have people wondering why developers do not create the Setup file , right? Completely done but then the installer will several GB or tens of GB by in it incorporated dozens of other things (like Android SDK, NDK, JDK, ...).
I recommend using the latest version V3.x, because the old version was outdated over 1 year ago already. The new version has many improvements, so the installation is complicated not least because of the command, the set almost renovation. Let's start right.
I must say this to you understand and enjoy the sympathy of me, my system only Win7-32 bit, Ram 2G so if you have another system like Win7-64, Win8, MacOS, Linux read reference only and try on your computer, how to install are remarkably similar, only diffrent the command line for each system. Maybe!
Preparation of Materials - Download the Correct Version for 32-bit or 64-bit Machine
1. Download Cocos2d-x v3.x now v3.6 (Apr.30, 2015) (NOT -JS version) at http://www.cocos2d-x.org/download
2. Download JDK 7.0+: http://www.oracle.com/technetwork/java/javase/downloads/index.html
3. Download Android Studio Bundle for Windows: http://developer.android.com/sdk/index.html.
Android Studio Bundle if you want to use it to code for Android, then you can install it because the SDK available while installing it. If you want to use another program, such as Eclipse to do, then you download only SDK Tools at the Other Download Options.
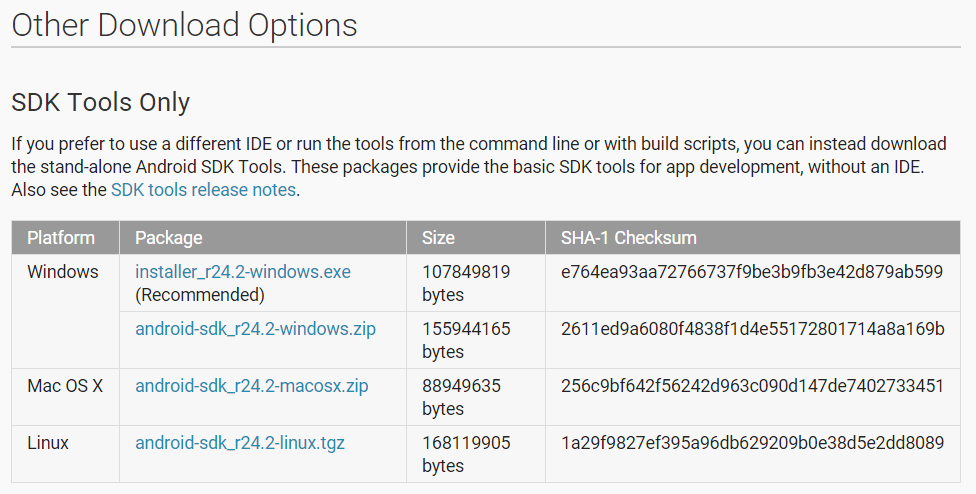
4. Download NDK R10E: https://developer.android.com/tools/sdk/ndk/index.html
5. Download Apache ANT 1.9.x (1.9.4): http://ant.apache.org/bindownload.cgi
6. Download Python 2.7.x (2.7.9): https://www.python.org/downloads
STEP 1: Install JDK, Python as regular software
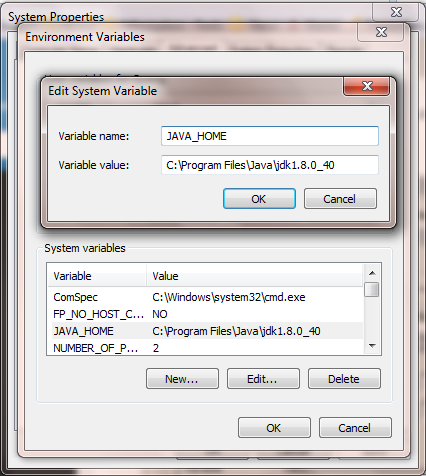
After install, you need to set up Environment Varibales. First, right click on Computer icon, select Properties. Next, click Advanced system settings -> choose Advance tab -> click Environment Variables...
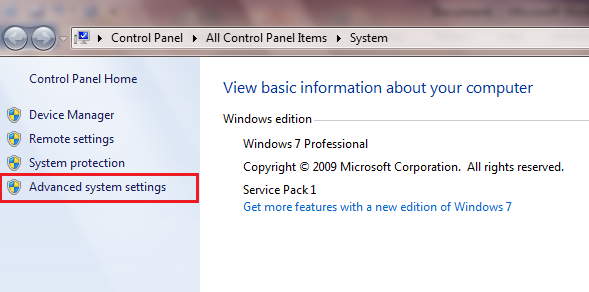
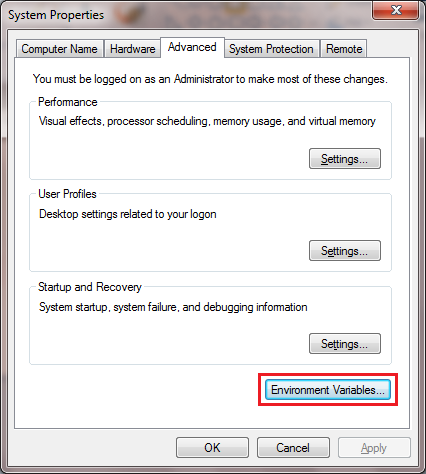
Edit Path of System variables and add Python path C:\Python27
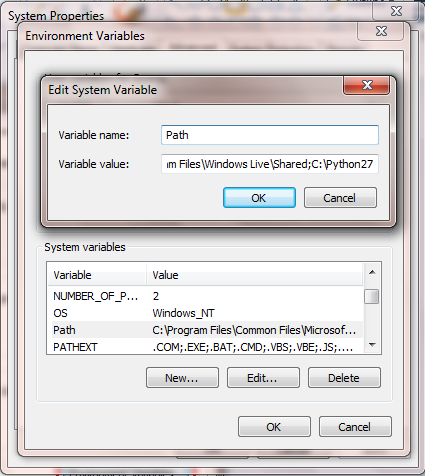
Then you click New ... to create new a variable named JAVA_HOME with a value of new JDK installation path, here is C:\Program Files\Java\jdk1.8.0_40
To be continued...
0 comments :
Post a Comment